# Build Hammered Room Keys in Ableton Live
Make a rounded, percussive keyboard sound with three octave-related tones, a closing filter, soft saturation and a spacious tail. Use **Wavetable → Saturator → Reverb** in **Live 12.4 Suite**.
[Play or download the finished sound — WebM](audio/Hammered-Room-Keys.webm) · [Complete settings](ALL_PARAMETERS.md)
## Step 1 — Shape the three pitched tones
Load **Wavetable** and apply the [starting settings](STARTING_STATE.md). Enable both main oscillators and the **Sub** oscillator. Choose **Basics → Basic Shapes** for both main oscillators, set their effect modes to **None**, and center both pans. Leave both filters Off for this step.
| Control | Oscillator 1 | Oscillator 2 |
|---|---:|---:|
| Position | 75% | 45% |
| Semitone | 0 st | +12 st |
| Detune | −7 ct | 0 ct |
| Gain | −6.0 dB | −15 dB |
These positions blend adjacent shapes in the wavetable. Oscillator 1 provides the stronger, hollow body; oscillator 2 adds a quieter upper octave.
Set **Sub Gain −27 dB**, **Sub Tone 100%** and **Sub Octave −1**. Set global **Transpose +12 st**. Together, these controls place the sub at the played pitch, oscillator 1 one octave above it and oscillator 2 two octaves above it.
Set **Volume −3.0 dB**, **Poly 6**, **Unison None** and **Glide 0 ms**. Keep **Time 0%** and **Global Mod Amount 100%**.


Give the amplitude envelope a fast strike and a gradual fall:
| Amplitude control | Value |
|---|---:|
| Attack | 1.00 ms |
| Decay | 1.40 s |
| Sustain | −42 dB |
| Release | 250 ms |
| Attack / Decay / Release slopes | 0% / 0% / 50% |
| Loop mode | None |
The low sustain leaves a faint tone when a note is held. Set **Velocity → Amp 50** and **Pitch Bend → Pitch +2 st** in the MIDI modulation matrix. Also set **Key → Filter 1 Frequency 100**; this takes effect when the filter is enabled. Keep other MIDI connections at zero.

[Play or download step 1 — WebM](audio/steps/step-01.webm)
## Step 2 — Close the filter after the strike
Enable **Filter 1**. Choose **Lowpass**, **24 dB**, and the **PRD** circuit. Set **Frequency 1.10 kHz**, **Resonance 6.2%** and **Drive 3.00 dB**. Use **Serial** routing and leave Filter 2 Off.
Set **Envelope 2** as follows:
| Envelope 2 control | Value |
|---|---:|
| Attack | 1.00 ms |
| Decay | 250 ms |
| Sustain | 0% |
| Release | 100 ms |
| Initial / Peak / Final | 0% / 100% / 0% |
| Attack / Decay / Release slopes | 0% / 50% / 50% |
| Loop mode | None |
In the modulation matrix, set **Env 2 → Filter 1 Frequency 10**. Keep other envelope and LFO connections at zero. Keep **Key → Filter 1 Frequency 100** in the MIDI matrix.
The envelope briefly opens the filter for the strike, then rounds the sound as it decays. Key tracking moves the cutoff with the played note, keeping the filter contour consistent across the keyboard.


[Play or download step 2 — WebM](audio/steps/step-02.webm)
## Step 3 — Thicken the strike with Saturator
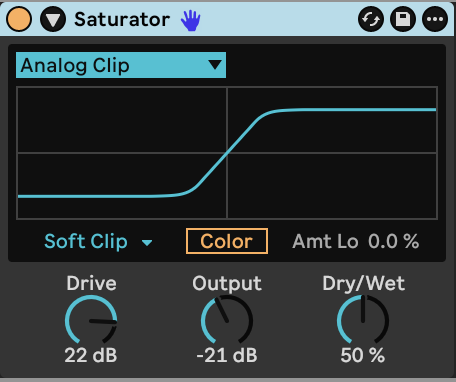
Place **Saturator** after Wavetable. Select **Analog Clip**, set **Drive 22 dB**, **Output −21 dB**, **Dry/Wet 50%**, and **Post Clip Mode Soft Clip**. Turn **Color** and **Pre DC Filter** Off.
The drive adds harmonics as the three tones pass through the same nonlinear curve. The dry blend retains the original attack. Keep the oscillator gains and Wavetable volume from step 1: the level entering Saturator changes its tone as well as its loudness.
[Play or download step 3 — WebM](audio/steps/step-03.webm)
## Step 4 — Add a spacious, dark tail
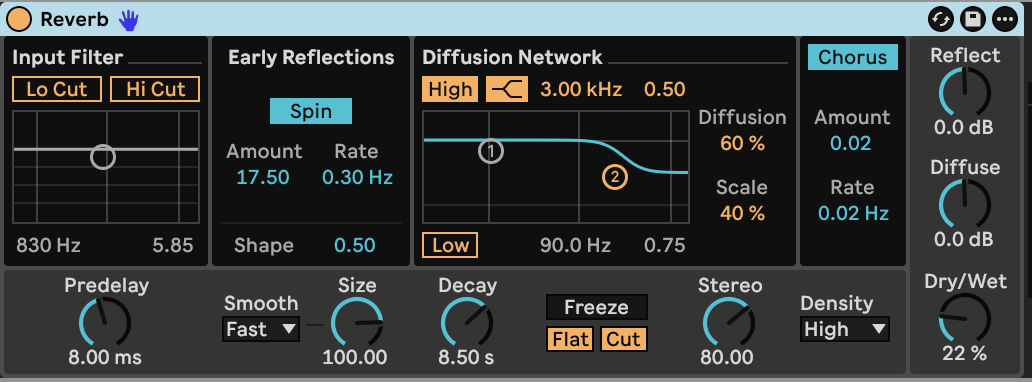
Add **Reverb** after Saturator.
| Reverb control | Value |
|---|---|
| Predelay | 8.00 ms |
| Size / Smoothing | 100.00 / Fast |
| Decay | 8.50 s |
| Stereo | 80.00 |
| Density | High |
| Dry/Wet | 22% |
| Input Lo Cut / Hi Cut | Off / Off |
| Reflect / Diffuse level | 0 dB / 0 dB |
| Early-reflection Spin | On |
| Spin rate / Amount | 0.30 Hz / 17.50 |
| Early-reflection Shape | 0.50 |
| Diffusion High | On, Shelf |
| High frequency / Gain | 3.00 kHz / 0.50 |
| Diffusion Low | Off |
| Diffusion / Scale | 60% / 40% |
| Chorus | On |
| Chorus rate / Amount | 0.02 Hz / 0.02 |
| Freeze | Off |
The low wet amount keeps the strike clear while the long, damped room hangs behind it. High-frequency damping lets the tail become darker as it fades.
[Play or download step 4 — WebM](audio/steps/step-04.webm)
Use a lighter touch for softer notes and a stronger strike for more level into Saturator. Short notes expose the release and room tail; held notes reveal the faint sustain. Up to six notes can sound at once.
## Downloads and settings
- [Finished sound — WebM](audio/Hammered-Room-Keys.webm)
- [Complete instrument and effect settings](ALL_PARAMETERS.md)
- [Wavetable starting settings](STARTING_STATE.md)
- [Build guide — Markdown](BUILD_GUIDE.md)
[Wavetable reference](https://www.ableton.com/en/manual/live-instrument-reference/#wavetable) · [Stock effects reference](https://www.ableton.com/en/manual/live-audio-effect-reference/)