# Build Random Filter Keys in Ableton Live
A rounded saw-wave instrument with a low octave, irregular resonant tone changes, separated stereo echoes and a long, dark room tail.
Use **Wavetable → Delay → Reverb** in Ableton Live 12 Suite. The full values are in [Complete settings](ALL_PARAMETERS.md).
[Finished sound — WebM/Opus](audio/Random-Filter-Keys.webm)
## Step 1 — Shape the two-octave saw body
The signal flow is **Wavetable → Delay → Reverb**, using stock devices in Ableton Live 12 Suite. Begin with **Wavetable** and both main oscillators on. Choose **Basics → Basic Shapes** for each oscillator and set **Position 67%**, at the saw-wave region. Use the [starting settings](STARTING_STATE.md) for the complete initial tone.
| Control | Oscillator 1 | Oscillator 2 |
|---|---|---|
| Transpose | 0 st | −12 st |
| Detune | +2 ct | 0 ct |
| Gain | −6 dB | −6 dB |
| Pan | Center | Center |
| Oscillator effect | None | None |
Enable **Sub**, with **Tone 0%**, **Gain −15 dB** and **Octave −1**. The sine sub supports the lowest fundamental. The small detuning of the upper saw introduces slow beating between overlapping harmonics.
Use **Poly**, **6 voices**, **Unison None**, global **Transpose 0 st**, **Glide 0 ms** and device **Volume −19 dB**. Enable **Filter 1** as a **24 dB low-pass**, **PRD** circuit, with **Frequency 300 Hz**, **Resonance 67%** and **Drive 3 dB**. Keep Filter 2 off and filter routing Serial.
Set the **Amp** envelope to **Attack 57 ms**, **Decay 57 ms**, **Sustain −2.3 dB** and **Release 57 ms**. Use **Attack slope 0%**, **Decay and Release slopes 50%**, and **Loop mode None**. This gives the note a softened edge and a short direct release while allowing held tones to sustain.
In the **MIDI** matrix, use **Key → Flt 1 Freq: 100**, **Vel → Amp: 50**, and **PB → Pitch: 2 st**. Higher notes open the filter proportionally; velocity controls amplitude, and pitch bend moves the tuning. Keep Env 2, Env 3 and LFO 2 unassigned. Leave **LFO 1 Amount at 0%** for this initial body, with global modulation amount 100% and Time 0%.



[Hear step 1 — WebM/Opus](audio/steps/step-01.webm)
## Step 2 — Make the filter jump between random values
Set **LFO 1** to the **Random** waveform, listed as **Noise** in the complete parameter table. Use **Rate 2.67 Hz** in Free mode, **Shape 0%**, **Amount 100%**, **Offset 0°**, **Attack 0 ms** and **Retrigger Off**.
In **Matrix**, set **LFO 1 → Flt 1 Freq: 20** and **LFO 1 → Flt 1 Drive: 10**. Every other internal modulation connection remains zero.
The LFO picks a new value approximately every 375 ms. Positive excursions open the resonant filter and increase its drive; negative excursions darken and soften the tone. Held notes change character without requiring repeated key strikes. Individual notes can develop different modulation patterns.


[Hear step 2 — WebM/Opus](audio/steps/step-02.webm)
## Step 3 — Add separated stereo echoes
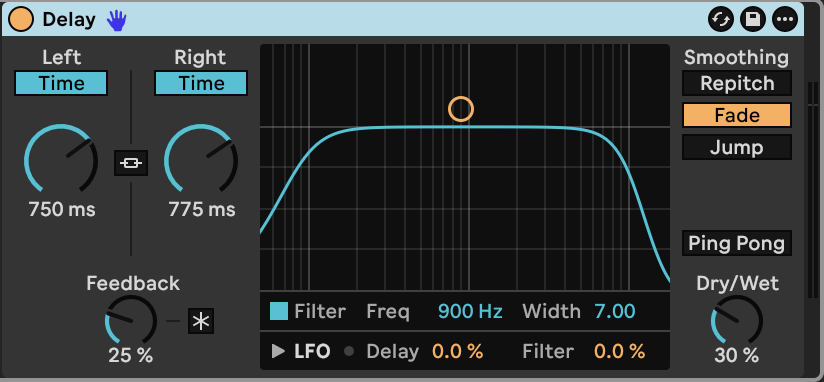
Place **Delay** after Wavetable. Turn **Link off**, use unsynced time controls, and set **Left 750 ms**, **Right 775 ms**, **Feedback 25%** and **Dry/Wet 30%**.
Enable its filter at **900 Hz**, **Width 7.00**. Use **Fade** smoothing. Keep **Ping Pong** and **Freeze off**, and both LFO modulation amounts at zero.
The repeats carry earlier filter states into the gaps between newer ones. Slightly different left and right times spread the echoes, while low feedback lets each repeat fade quickly.
[Hear step 3 — WebM/Opus](audio/steps/step-03.webm)
## Step 4 — Add a quiet, dark room tail
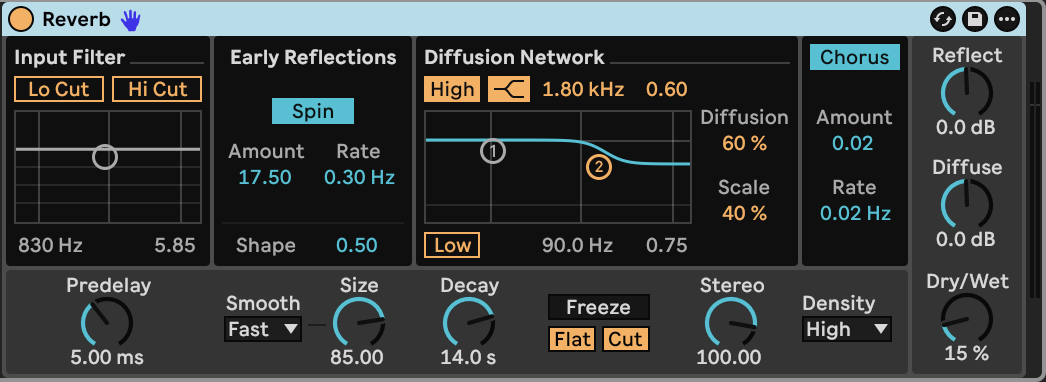
Follow Delay with **Reverb**.
| Control | Value |
|---|---|
| Predelay | 5 ms |
| Size / Smoothing | 85 / Fast |
| Decay | 14.0 s |
| Density | High |
| Stereo | 100 |
| Dry/Wet | 15% |
| Input Lo Cut / Hi Cut | Off / Off |
| Diffusion High | On, Shelf, 1.80 kHz, Gain 0.60 |
| Diffusion Low | Off |
| Diffusion / Scale | 60% / 40% |
| Reflect / Diffuse level | 0 dB / 0 dB |
| Spin | On, 0.30 Hz, Amount 17.50 |
| Early-reflection Shape | 0.50 |
| Chorus | On, 0.02 Hz, Amount 0.02 |
| Freeze | Off |
The long decay leaves a soft background behind the distinct echoes. High-frequency damping keeps the room darker as it fades, and the low wet mix preserves the direct resonant tone.
[Hear step 4 — WebM/Opus](audio/steps/step-04.webm)
Hold a note to hear the random tone changes develop. Short notes reveal the direct envelope and separated echoes; chords combine several moving filter patterns over the common delay and room tail.
## Downloads and settings
- [Complete instrument and effect settings](ALL_PARAMETERS.md)
- [Wavetable starting settings](STARTING_STATE.md)
- [Finished sound — WebM/Opus](audio/Random-Filter-Keys.webm)
[Ableton Wavetable reference](https://www.ableton.com/en/manual/live-instrument-reference/#wavetable)