# Build a Three Octave Bass in Ableton Live
Build a dark monophonic bass with three saw waves, a closing filter envelope and a saturated finish. Use **Operator → Saturator** in **Ableton Live 12 Suite**.
[Download the finished WebM](audio/Three-Octave-Bass.webm) · [Read with audio players](/tutorials/three-octave-bass/)
Follow the three steps in order. The [starting settings](STARTING_STATE.md) and [complete settings](ALL_PARAMETERS.md) collect the controls in one place.
## Step 1 — Stack three saw waves
Load **Operator** in **Live 12 Suite**.
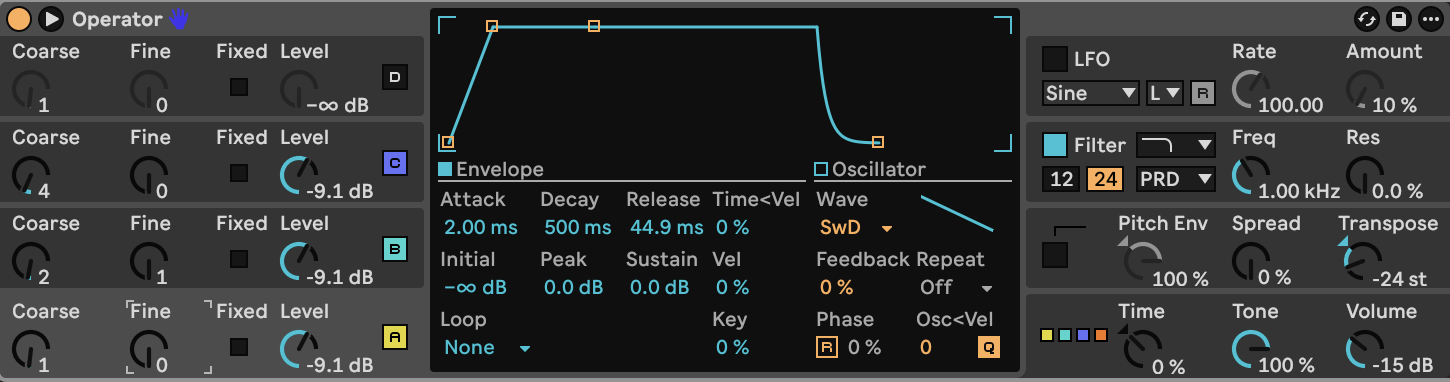
Click Operator’s lower-right global area. Choose **algorithm 11**, the far-right diagram with four oscillators side by side. Each oscillator feeds the output independently. Enable **A, B and C** and switch **D Off**.
Select **Saw D** for each active oscillator, then enter:
| Oscillator | Coarse | Fine, Operator units | Level |
|---|---:|---:|---:|
| A | 1 | 0 | −9.1 dB |
| B | 2 | 1 | −9.1 dB |
| C | 4 | 0 | −9.1 dB |
Set **Transpose −24 st**, **Tone 100%**, **Volume −15 dB** and **Spread 0%**. These ratios place the oscillators two octaves below the played note, one octave below it, and at the played pitch. B’s **Fine 1** adds a small tuning offset and slow beating; this value is an Operator control value, not one cent.
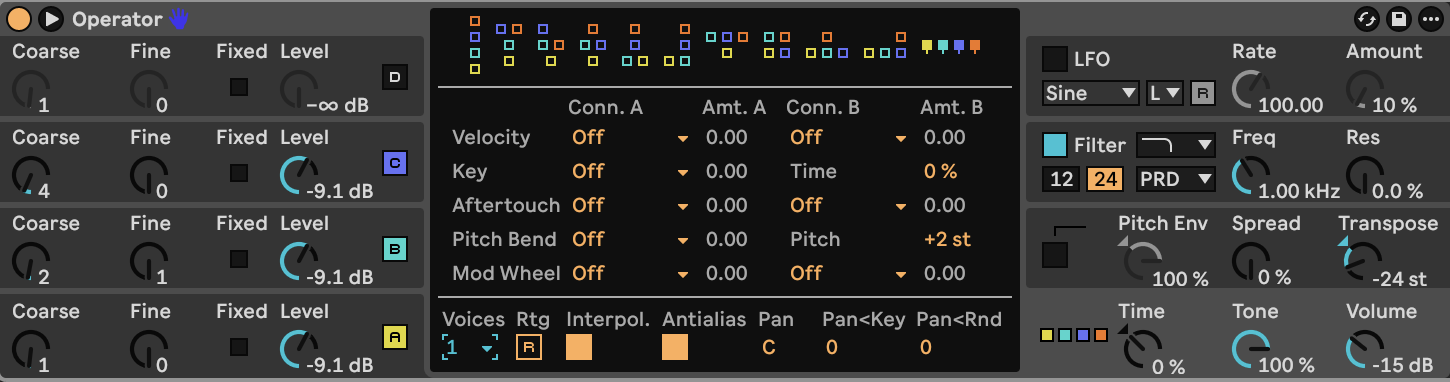
In the global display, set **Voices 1**, global **Retrig Off**, interpolation and antialias **On**, Pan centered, **Pan < Key 0**, **Pan < Rnd 0**, **Time 0%** and **Time < Key 0%**. Set the pitch-bend range to **2 st**. Keep **Glide, Pitch Env, LFO, Filter and Shaper Off**.
For A, B and C, keep **Fixed Off**, frequency quantization **On**, oscillator **Retrigger Off**, **Phase 0%**, **Feedback 0%**, **Level < Velocity 0%**, **Level < Key 0%** and frequency/velocity modulation **0**. Set each amplitude envelope to:
| Envelope control | Value |
|---|---|
| Attack | 2.00 ms |
| Decay | 500 ms |
| Sustain / Peak | 0 dB / 0 dB |
| Release | 44.9 ms |
| Initial / End | −∞ dB / −∞ dB |
| Loop | None |
| Attack / Decay / Release slopes | 0% / 100% / 100% |
| Time and release velocity scaling | 0% |
Peak and sustain are equal, so the amplitude stays steady while a note is held. The short release makes the bass stop quickly when you lift a key. The filter added in step 2 will shape the attack’s brightness.
These screenshots show the finished instrument’s amplitude and global panels. **Keep Filter Off for step 1**, even though it is enabled in the pictures.
**Hear step 1:**
[Play or download step 1 WebM](audio/steps/step-01.webm)
## Step 2 — Close the filter after the attack
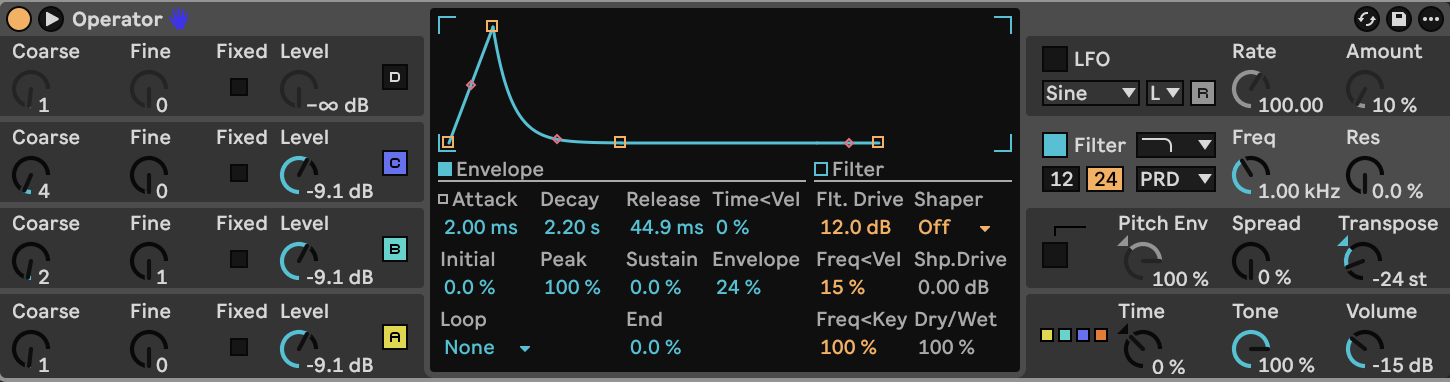
Enable Operator’s **Filter** and click its section to open the central controls.
| Filter control | Value |
|---|---|
| Type / Slope | Lowpass / 24 dB |
| Circuit | PRD |
| Frequency | 1.00 kHz |
| Resonance | 0% |
| Drive | 12 dB |
| Keyboard tracking | 100% |
| Velocity tracking | 15% |
| Envelope amount | 24% |
| LFO modulation | Off |
Keep **Transpose −24 st** and **keyboard tracking 100%** together with the displayed **1.00 kHz** cutoff: pitch tracking changes the filter’s operating frequency as you play. Higher velocities raise the cutoff slightly.
Set the filter envelope to:
| Envelope control | Value |
|---|---|
| Attack | 2.00 ms |
| Decay | 2.20 s |
| Sustain | 0% |
| Release | 44.9 ms |
| Initial / Peak / End | 0% / 100% / 0% |
| Loop | None |
| Attack / Decay / Release slopes | 0% / 100% / 100% |
| Release velocity scaling | 0% |
The envelope opens the filter at the beginning of the note, then closes it toward the sustained cutoff. The curved decay concentrates much of the brightness change near the attack. The amplitude envelope still holds its level, leaving a dark body after the brighter opening.
**Hear step 2:**
[Play or download step 2 WebM](audio/steps/step-02.webm)
## Step 3 — Add saturation and play the bass
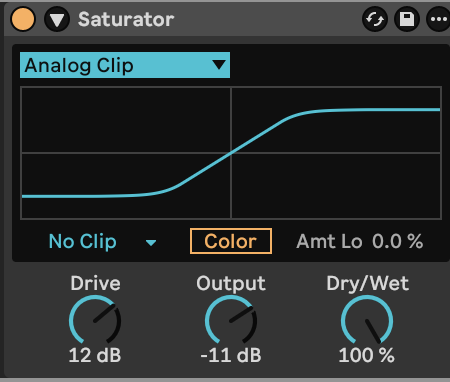
Add **Saturator** after Operator and set:
| Saturator control | Value |
|---|---|
| Curve | Analog Clip |
| Drive | +12 dB |
| Output | −11 dB |
| Dry/Wet | 100% |
| Color | Off |
| DC filter | On |
| Output clip mode | No Clip |
| High Quality | On, in the device context menu |
Drive pushes the waveform into the clipping curve, rounding peaks and adding harmonics. The Output control brings the level back down afterward. Keep Color Off so its frequency shaping stays inactive.
**Hear step 3:**
[Play or download step 3 WebM](audio/steps/step-03.webm)
The final signal order is **three parallel Operator saw waves → Operator’s driven lowpass filter → Saturator**.
Play **C2 / MIDI 48**, **C3 / MIDI 60** and **G3 / MIDI 67**, then try C3 at velocity **65** and **100** to vary the brightness. Use short notes for rhythmic bass lines or hold a note to expose the slow oscillator beating. Try overlapping C3 and E3: with one voice enabled, only one note sounds at a time. Keep Glide Off for immediate pitch changes.
## Downloads and settings
- [Finished audio, WebM](audio/Three-Octave-Bass.webm)
- [Complete device settings](ALL_PARAMETERS.md)
- [Starting settings](STARTING_STATE.md)
- [Markdown guide](BUILD_GUIDE.md)